How can you get the most value from your yeast? Reusing yeast is a smart way to lower ingredient costs, streamline your production schedule, and enhance beer quality. But making the most of your yeast starts with asking the right questions. From pitch to performance, here are some key considerations and practical tips to help you reuse yeast effectively and consistently to get the most bang for your buck.
Which Strain Should I Choose?
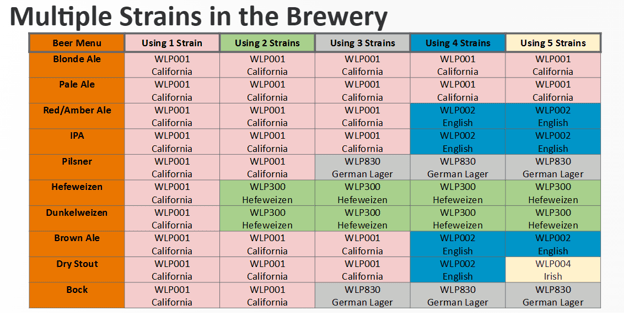
1. Pick A Versatile Strain:
Some of the best house strains should cover a wide range of beer styles and fermentation temperatures while still providing consistent fermentation results.
- Flavor - Are you looking for something cleaner to let other ingredients shine or more yeast-driven flavor?
- Attenuation - Should fermentation leave some residual sugars for mouthfeel or malty characters, or attenuate to a higher degree for a drier finish?
- Fermentation Temperatures - How does temperature affect strain performance? Is the strain versatile enough to be used at different temperature ranges to produce varying flavor compounds?
- Flocculation - Is this strain a high flocculator that may need rousing during fermentation, or is it a low flocculator, where harvest yields could be an issue?
Yeast Examples
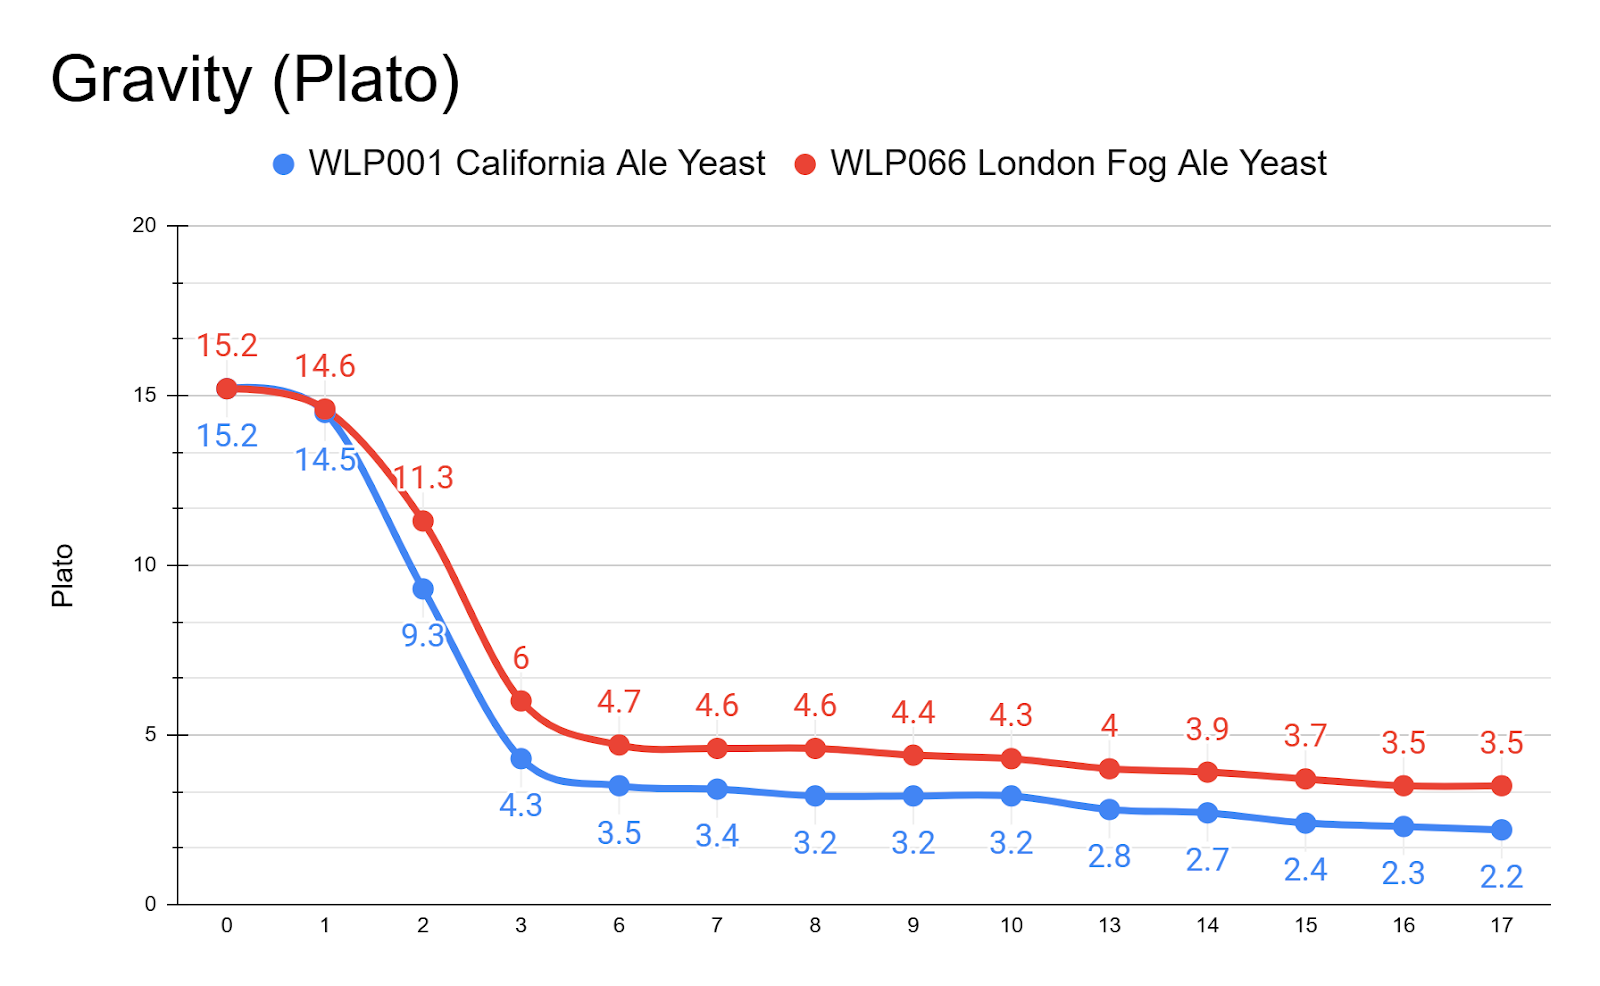
Using WLP007 Crisp English Ale Yeast at warmer temperatures can bring out higher esters suitable for English-style ales, while fermenting on the colder side provides a cleaner profile to highlight hops and malt.
This strain is also great for higher gravity beers, achieving 80% attenuation even with 10% ABV beers. In these cases, it is best to rouse the yeast and give it adequate nutrition during fermentation.
2. Pick a Robust Strain:
Not all yeast strains handle multiple generations well. Some Saccharomyces cerevisiae ale strains can be reused 5–10 times or even more, while certain lager and saison strains may only perform optimally for fewer generations.
Some of these strains are great for specialty or seasonal brews. For a house strain, choose one that you can harvest and reuse multiple times, helping to reduce costs and provide more value.
Why Should I Plan My Brew Schedule?
Ask yourself which upcoming beers can be fermented with your selected yeast and how frequently these beers will be produced. This will help you identify an opportunity to schedule fermentations to capitalize on yeast harvests and minimize storage time. This can be more difficult with seasonal or “one-off” brands, but being creative with scheduling a second, or even third, sequential batch can help better utilize the unique strains.
1. Plan and Document Your Brewhouse Schedule
-
- What brands can this strain be used in?
- How often will it be used?
- How long will a strain be in storage before being used in the next batch?
- Is there enough yeast yield to pitch into multiple subsequent batches?
2. Understand your lineage
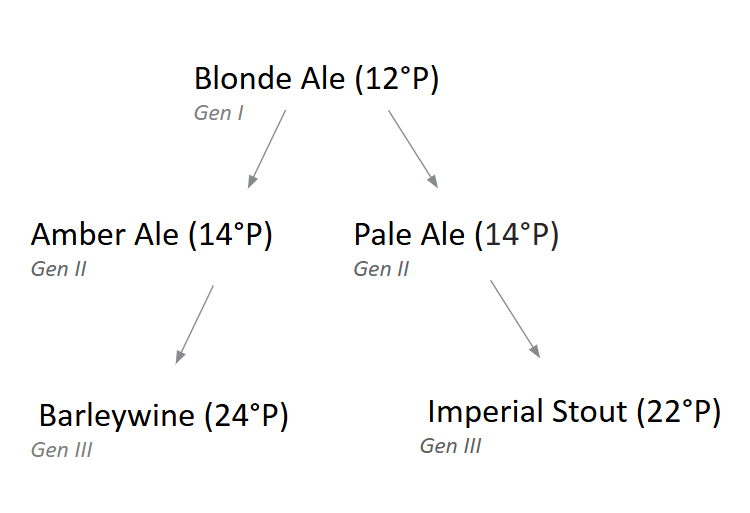
Always document the batch and its original gravity, yeast strain used, generation number, date harvested, and the fermenter from which it was collected. Tracking your yeast in a yeast tree can be an effective way to track how many beers can come from a single pitch of yeast.
Generally, the sweet spot for fermentation is around 3-5 generations as the yeast gets suitably acclimated to the fermentation environment.
Hop-heavy IPAs, big-ABV beers, and seltzers are not ideal conditions for yeast. Plan accordingly, as these ferments will likely not yield great harvest results and are better suited to be pitched with the last generation of a particular yeast culture.
Tip: If gravity increases for subsequent brews, it is best to use cultures from lower-gravity fermentations. The same concept applies to increasing color in brews.
How is the Fermentation Performance?
How do you know when to give up on a strain and order a new one? When a strain isn't in ideal conditions, longer fermentation times and unwanted off-flavors can be costly.
1. Track Trends:
Log fermentation times, attenuation, pH, and flavor over each generation. Document these patterns for each strain to create benchmarks; plot them on a simple Excel graph, and over time, you'll recognize normal behavior versus potential issues.
2. Pay Attention to pH Drop:
Daily gravity and pH readings during active fermentation tell a more valuable story than any single data point. Monitor the pH drop within the first 48–72 hours as a reliable indicator of yeast activity and vitality. Fermentation solutions are easier to fix the sooner they are found.
Sluggish pH drops in these initial hours typically signal trouble and poor yeast health.
3. Know When to Retire a Yeast:
Don’t try too hard to revive or resuscitate. When performance is lacking and viability drops below 85%, it’s time to get fresh yeast.
Signs to Retire Your Yeast:
-
- Inconsistent fermentation
- Longer lag times
- Sluggish or stuck fermentations
- Increased off-flavors
- Poor flocculation or viability
TIP: Watch out for off-flavors, especially increases in esters, phenols, and sulfur -they can indicate stress, mutation, or contamination.
When Should I Harvest?
When is the right time to harvest yeast from the fermenter? Krausening yeast is some of the healthiest and most active yeast, but in modern brewing, bottom cropping is generally cleaner and more commonly practiced.
Due to hydrostatic pressure, alcohol levels, yeast hot spots, and trub, collecting yeast at the wrong time can result in low-quality yeast and product loss. Consider some of these factors when harvesting your yeast.
1. Time It Right:
Aim to collect your yeast when the beer is about 1 °Plato higher than expected terminal gravity, just before initiating a diacetyl rest. At this stage, the most flocculent cells have already settled in the cone, contributing little to finishing fermentation.
Applying slight head pressure or supplementing with minerals such as calcium can promote improved flocculation and enhance beer clarity.
2. From the Middle: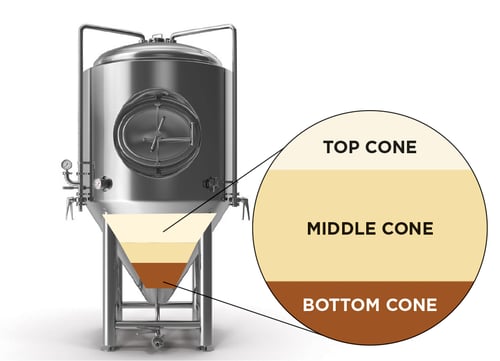
In conical fermenters, collect yeast from the middle layer — it contains the most viable cells. The bottom may have trub, while the top could have dead cells or hop debris.
Trub dumps are key and can be performed daily during fermentation or when harvesting to avoid capturing dead or compromised yeast cells, hop matter, and coagulated proteins.
Perform standard transfer techniques, keep things clean, and slowly open the valve as you dump trub and transfer yeast into a storage vessel to avoid tunneling.
How Long Should I Store Yeast?
If not stored properly, yeast can rapidly deteriorate before it can be used again. The best case scenario is always the shorter, the better for yeast storage. Be sure to consider some of these points when storing your yeast.
- Cool Temp: Store at 34–40°F (1–4°C) to slow metabolism and extend viability.
- Use Quickly: Ideally, reuse within 1 week, though up to 2–3 weeks may be feasible with excellent sanitation and monitoring.
- Limit Air Exposure: Oxygen exposure post-fermentation can damage yeast viability and cause rapid depletion in glycogen reserves, leading to unhealthy yeast and longer lag times.
- Limit CO2 Exposure: CO2 can also be toxic to yeast. Remember to vent storage vessels daily to prevent CO₂ buildup from stressing the cells, and aim to re-pitch as soon as possible. Ideally, maintain neutral head pressure or only slight pressure on yeast storage vessels.
- Sanitize Everything: From sampling tools to storage containers, sanitize rigorously to avoid contamination.
How is My Yeast Health?
Is your yeast viable for repitching? Assessing yeast health prior to pitching is essential for batch integrity and fermentation success. Determining the optimal pitch rate enables consistent fermentations and reliably drives desired flavor and aroma outcomes.
- Viability Test: Use methylene blue or methylene violet staining to assess the live/dead cell ratio under a microscope. Target a minimum viability of 85% for harvested yeast.
- Cell Count: Perform a cell count to ensure you're pitching the right amount (~1 million cells/mL/°P for ales & ~1.5 million cells/mL/°P for Lagers). Pitching the right amount helps standardize fermentation timelines as well as yeast growth, which impacts beer flavor and aroma!
- Adjust Pitching Rate: Older generations may need increased pitching rates to account for lower viability, but ensure yeast is still over 85% viable.
Summary
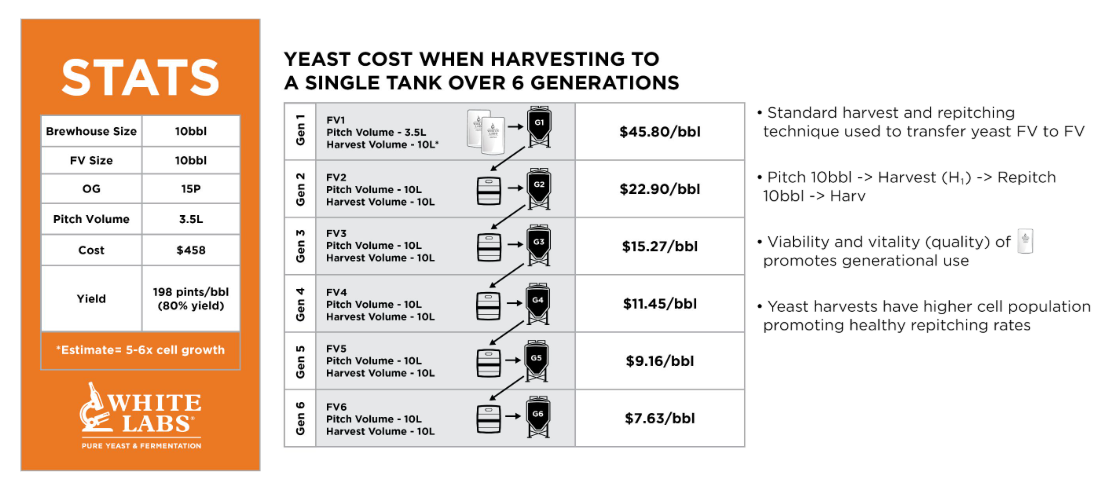
Addressing these yeast management questions proactively - whether planning for a monthly, quarterly, or annual brewing schedule - yields significant benefits. Strategically reusing yeast can reduce the yeast costs by up to 50% and extend culture viability, helping you sustain optimal fermentations over time.
Happy Yeast = Happy Beer (and Happy Brewers)!